
In bulletin #186, I spoke about the need for a "firewall" to protect your computer from unwanted attacks from the Internet. In my recent computer security seminar, presented through the Small Business Development Center and the South Metro Denver Chamber of Commerce, the topic of firewalls was extensively discussed. Firewalls are no longer optional, given the number and aggressiveness of attacks on our computers. When installing a firewall however, you need to understand that there is a certain amount of annoyance and frustration involved. The good news is, it will pass after a short period. Understanding why it happens will help you deal with it, and that is the goal of this bulletin.
To give you a real-life example, I documented the installation of a firewall on my own personal computer. I use an excellent one called Zone Alarm. As of this this writing, itIt is FREE to individual users. I downloaded it over the Internet and installed it in a matter of minutes. Once the firewall was installed, I was no longer able to send and receive email. The Firewall was blocking my access to my Internet Service Provider (ISP) and to their email servers. What is documented here are the steps I took to correct this problem. While this was not the only thing I had to do, it does illustrate the concepts of how firewalls work and why you have to tell a firewall what you want it to do.
Bi-directional firewalls are an absolute necessity these days.
The one I use personally is called Zone Alarm it is available FREE to individual users.
You can download it from this site:
Zone Alarm Download Site
The thing about any firewall is this. It has to be taught, at least once, that it is okay to allow access to and from a particular web site or computer. If we didn't do that, it would do its job and block access to ALL other computers and all web sites. A firewall has no way of knowing what to allow and what to block, unless we tell it. Whether you use a free product like Zone Alarm or a purchased product from Symantec or McAfee or any number of other vendors, there will be a requirement to tell it what Internet addresses are on your own "approved" list of safe addresses.
What follows is an example showing the first four configuration settings I made when installing Zone Alarm on my computer.
The example starts here ~~~~~~~~~~~~~~~~~~~~~~~~~~~~~
Zone Alarm terminology defines two "zones" which they call the "Trusted Zone" and the "Internet Zone". By default, all as yet unidentified computers (all Internet sites AND any additional computers or printers you may have networked at your home) are initially considered to be in the Internet Zone and are denied access to your computer. By default, all access to and from these machines and websites is considered potentially harmful and is blocked. The Trusted Zone is where you tell the firewall which addresses you trust and want to always allow access to and from.
Entry #1 - The one you would probably never figure out on your own -
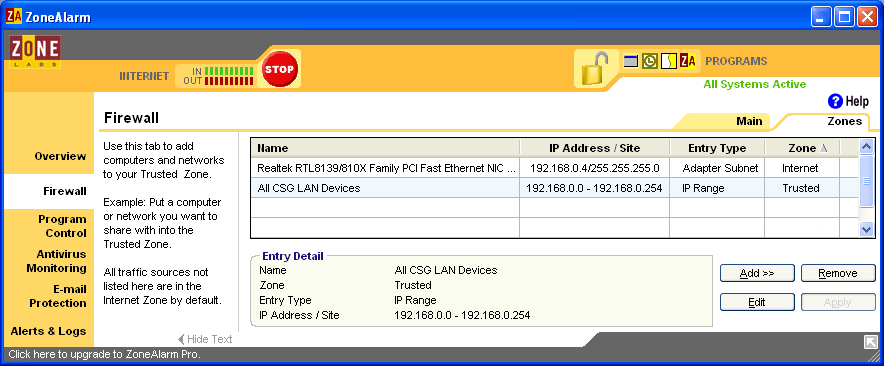
When Zone Alarm was installed, it found and registered my ethernet card as its first device in the Trusted Zone. This entry is done automatically and cannot be edited or removed. They do this for you because most of us wouldn't realize that this was even necessary and would be sitting here wondering why NOTHING works now? If you look at the third image below, you will see this as the top entry.
Entry #2 - Enabling access to other machines at my home -
The second entry on the Trusted list was made by me because I have multiple computers networked together and I want to be able to share files and printers between them. When working on customer machines, I often want to be able to download files from my own machines to the customer machine. To do this, I plug the customer machine into my network. Normally, adding an new computer to the network would require me to list it in the Zone Alarm Trusted Zone, before I could access any of my other machines. By setting up a range of valid IP addresses in advance, I just plug in the customer machine and I'm ready to go.
For purposes of reading what follows -
Entries 3 through 5 - Enabling ISP and email access -
What I really want to tell you about however are entries three, four, and five, the ones pertaining to accessing my ISP and my email. As I mentioned earlier, my ISP and its email servers are initially assumed to be in the Internet Zone. I have to add them to my Trusted Zone list to allow me to sign on to my ISP (giving me Internet access) and then to sign onto each of the email servers to send and receive email.
TECHNICAL NOTE - This is why you sometimes have a situation where you are able to access the Internet but are unable to send or receive email. What you are seeing is that you are successfully accessing the ISP's computer which connects you to the Internet but unable to access one or both of the email servers. (The POP server receives all the email addressed to you and holds it until you ask to receive it. The SMTP server formats and sends out email when you tell it to do that.) Assuming no changes have been made to your own computer's configuration, the email server(s) are most likely down for some reason.
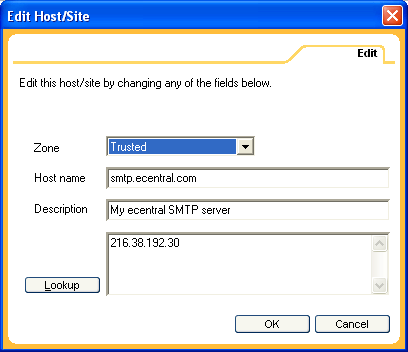
To enable email access to Ecentral email, I made three "Trusted Zone" entries, one to access Ecentral itself (my actual Internet connection) and one each for Ecentral's POP and SMTP servers, as follows:
While connected to the Internet . . .
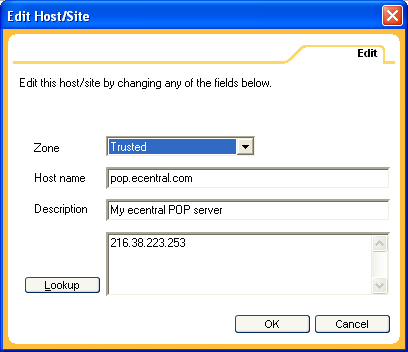
(If Zone Alarm is currently active, you may get a message asking if you will allow access to the DNS server to locate ecentral? It won't identify this as the DNS server, but rather as a specific IP address. The user will need to Allow this.)
Click OK to exit the window shown above.
Repeat the above steps, starting with Add, for the SMTP server
That should return you to this screen:
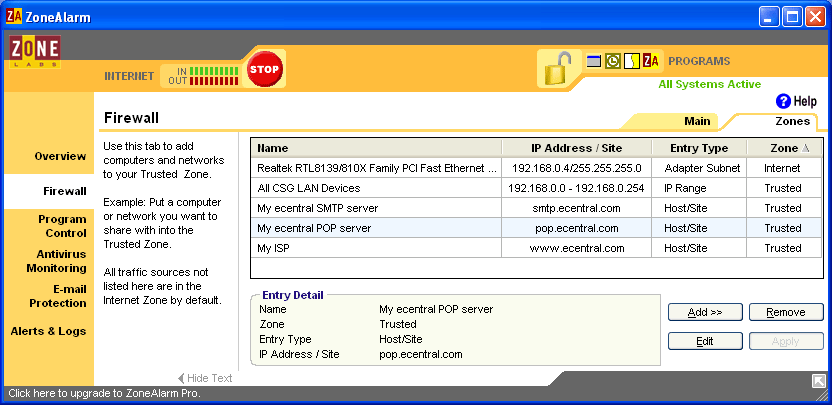
From this point forward, as you visit new websites for the first time, Zone Alarm will display pop-up windows asking you whether to allow access or block access. There will be a box which allows you to "always take the same action" if you try to access that address again. Over a short initial period of time, this is how the firewall "learns" what to do. The interruptions become fewer and fewer.
Don't let the names throw you -
Different brands of firewalls may call the "Trusted Zone" by another name and may have different ways of entering the information, but the concept is the same for all of them. You are simply telling the firewall, "Here's a computer which it is safe to communicate with". If you understand this bulletin, it will go a long way towards your understanding of how Internet addresses work and how firewalls work to block attackers from gaining access to your computer. Now you can rest easier!